- Introduction
- Quickstart
- Playing games
- Streaming games
- Developer Tools
- How to Disassemble a ROM
- How to View Registers
- How to View a Game’s Color Palette
- How to Disable/Enable Layers
- How to View Game Tiles in Detail
- How to view Object Attribute Memory (OAM)
- How to View Matrices (matrix)
- How to View Lights
- How to View Sound Output
- RAM Watch
- RAM Search
- How to Run Lua Scripts with DesMume
1. Introduction
What is DeSmuME?
DeSmuME is a versatile, feature-rich, and powerful Nintendo DS emulator for use on the PC, Mac, and Linux platforms. With it you can open ROMs, play games, save states, configure your screen and input preferences, record video internally as well as externally, and even debug and enter into the ROM to see the inner workings of the code.
An emulator mimics the processing architecture of the native system via software. This naturally creates overhead when being run on an X86 or x64 platform – Indeed, one of the first emulators of the 90s, NESticle (an NES emulator) ran acceptably on a 66 MHz PC of the time, when the Nintendo itself ran off a 1.79 MHz processor. The same is true for DeSmuME, which requires a lot more processing power than on its native platform, with the system requirements being 30 times that of the raw throughput of the Nintendo DS. Emulators themselves are not controversial, but when used with ROMs (the actual data inside a Nintendo cartridge) extracted from a game, that’s when the legalities begin to blur. See the disclaimer for more information.
What is the Nintendo DS?

The Nintendo DS is a dual-screen handheld game console developed and released by Nintendo between 2004 and 2005, and discontinued in 2013. It is a region-free device. DS stands for “Developers’ System” or “Dual Screen” and it featured the then new two LCD screen concept; the bottom LCD was a touchscreen, and gameplay was split between the two screens. A built-in microphone, as well as support for wireless connectivity were standard. Both screens were encompassed within a clamshell design similar to the Game Boy Advance SP, or an old flip phone.
As of June 30th, 2016, it has sold 154 million units worldwide, with the most popular game New Super Mario Bros. selling 30.8 million copies.
What is supported?
The documentation has been written for the latest version of the emulator, v 0.9.11 running on the Windows 10 platform.
While DeSmuME is a fairly robust emulator, certain functions are not fully supported, namely:
- Game Boy Advance games
- Game Boy Advance games are not playable in DeSMuMe. To play Game Boy Advance games on your PC, use a Game Boy Advance emulator.
- However, DeSmuME can still emulate a Game Boy Advance game being inserted in the cartridge slot. You can use this to unlock more content in certain DS games. Click here for more info.
- WiFi features
- No WiFi features are supported. This includes online multiplayer and downloading content.
Installation
The installation files used were sourced from DeSmuME’s homepage. The version we are covering is found under the link for Windows 64-bit (x86-64).
To install the software, first download it, then extract it into a folder of your choosing. There is no MSI or other installer; you may make a desktop shortcut to the executable and run it by double-clicking on the icon. Here’s a very quick video segment about how to install it.
Disclaimer: Downloading ROMs

A ROM is basically the code for an entire game. Usually the code is ripped, transcribed, or otherwise extracted from a legitimate copy of a game. It is generally understood that downloading a ROM is illegal if you do not already own a physical copy of the game, however fair use does not always apply and is a gray area. We will not be covering how to obtain ROMS, however a quick Google search for Nintendo DS ROM should be sufficient. Download ROMS at your own risk.
2. Quickstart
Starting the emulator and loading a ROM
- To play a game, start the DeSmuME executable from the location where you extracted it, or by the shortcut if you made one.

- When DeSmuME launches, click on File > Open ROM, or press CTRL+O. Select your ROM from the saved path, and click Open.

- The ROM will load. Please note the default controls below – to change them click here.
This video will show you how to tweak the settings additionally.


3. Playing games
Configuring Controls
You can configure the controls to your liking by assigning the DS buttons to keys on your keyboard or buttons on nearly any sort of connected game controller.
- In the menu bar, click on Config > Control Config.

2. Click on a field next to a button to select it.
3. Press the desired key on your keyboard, or a button on a connected controller, to assign it to the corresponding DS button.
4. The selection will automatically move to the next field. You may either select another key or button for the input, or click OK if satisfied.
Adding DS Peripheral Controllers
DeSmuME can emulate several DS peripheral controllers which in real life were inserted into the DS’s Game Boy Advance slot. These include the Guitar Hero Guitar Grip, the Piano for Easy Piano and the Taito Paddle controller.
To connect and configure these virtual controllers:
1. In the menu bar, click Config > Slot 2 (GBA slot).
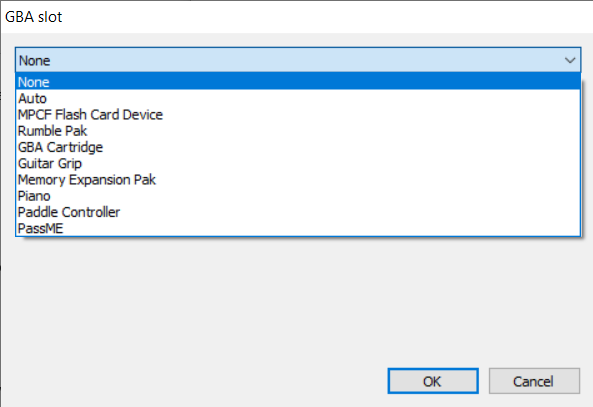
2. Select the controller from the drop-down menu.

3. Click on a field next to a button to select it.
4. Press the desired key on your keyboard, or a button on a connected controller, to assign it to the input.
5. Click OK.
Adding Game Boy Advance Games
DeSmuME is not able to play Game Boy Advance ROMS – for this, you would require a Game Boy Advance emulator.
However, certain DS games have extra features that are activated by inserting a particular Game Boy Advance game into the Game Boy Advance slot (click here to see which games support this feature). DeSmuME is able to emulate this with GBA ROMs.
To add a Game Boy Advance game:
1. In the menu bar, click Config > Slot 2 (GBA slot).
2. Select GBA Cartridge from the drop-down menu.

3. Select the ROM (.gba) file to load.
4. Click OK.
Changing the Display
Rotating the Screens
Some DS games require the system to be turned on its side to be properly played.
To rotate the screens counter-clockwise or clockwise, click the left and right arrow buttons in the toolbar.


Alternatively, in the menu bar, click View > Rotation and select a setting.
Changing the Screen Layout
Unlike a real Nintendo DS, in DeSmuME you can actually change the position of the two screens.
To position the two screens beside each other, click View > LCDs Layout > Horizontal.
To reposition them one on top of the other, click View > LCDs Layout > Vertical.

Vertical view
Horizontal viewTo insert a gap between the screens (as there is on a physical DS), click View > Screen Gap and select Narrow Border, DS (small) or DS (large). To change the colour of the gap, select White, Grey or Black.
Changing Window Size
To change the window size, click View > Window Size and select a size.Select Always On Top to force the window to stay on top of any other windows you may have open.
Saving and Loading
Saving and Loading In-Game
As with actual DS games, you are able to save and load in-game by whichever method particular to the game. By default, the saves are stored in the DeSmuMe\Battery folder.
Downloading Save Files
You are also able to download save files that other users have uploaded. To use these saves:
1. Download them and save them in the DeSmuME\Battery folder.
This is usually sufficient, however, if this does not seem to work:
- In the menu bar, click File > Import Backup Memory and select the save file.

2. Ensure that AUTO (from current save data size) is selected and click OK.
Saving States
DeSmuME is also able to save a game at any point in time using what is known as a state.
To save a game using a savestate, click File > Save State and then select a slot.
If you wish to save the state under a particular name, click File > Save State As.
Loading States
To load a savestate, click File > Load State and select a slot.
If the state is located in a different folder, click File > Load State From.
Cheats
Adding and Activating Cheats
With DeSmuME, you can harness the power of cheats to alter your gameplay experience. These cheats can be found online from various sources.
To add cheats:
- Start the ROM which you would like to add cheats to.
- In the menu bar, click Tools > Cheats > List.
- In the bottom left of the window, click Action Replay.
- Copy the cheat into the code field. You may also enter a description in the field below, if you like.

- If you would like the code to be active, ensure that turn code on is ticked.
- Click OK.
4. Streaming games
Getting ready to stream
The following steps outline preferred settings for most situations with good quality output from DeSmuME to be captured by your hardware or software.
- Start DeSmuME, and select the following from the top menus:
- View > LCD Layout, select Horizontal
- View > LCD Layout > ensure Main Screen first is checked
- View > Window Size > you may set your desired window size
- View > Magnification filter > select SuperEagle
- View > Display Method > ensure Open GL is checked
- Config > Emulation settings, ensure that Use dynamic recompiler is set to 1 (slower systems will want to set it to 50) and all other boxes are checked as in the picture below:

- Config > 3D settings – Ensure that OpenGL 3.2 is selected under Renderer, and that Enable Edge Marking is disabled. All fields should match the picture below:

- Config > Frame Skip > ensure both Limit frameskip and 0 (never skip) are checked
- Now you are ready to load a ROM and configure your controls, if not already done
A summary video of the most common settings is available here.
Displaying on screen timers and frame counters
These advanced functions are useful if you want to mark frames during a recorded session to bring attention to an item, move, or skillful gameplay. The frames-per-second counter can help you determine where the system is lagging and help to adjust certain settings
To enable the frame counter, from the top menu select View > HUD > and check Display Frame Counter. Selecting this option will display the emulation frame number. This way you can tell how long you have been playing the game. It is also useful for timestamping emulation events – you can tell if you made it out of a level faster or slower than previously. To disable the frame counter, from the top menu select View > HUD > and uncheck Display Frame Counter.
To enable the frames-per-second counter, from the top menu select View > HUD > Display FPS. Selecting this option causes the frames-per-second to be displayed. It also displays an additional 3D counter, which shows how frequently the game is updating its 3D graphics. To disable the frame counter, from the top menu select View > HUD > and uncheck Display FPS.
Recording
T.A.S. format
To record a T.A.S. (tool-assisted speedrun) format movie, go to File > Record Movie. A window will appear asking you where you wish to save the file:

Select the location you wish to save it to by pressing the … button. You can also put your name under Author.
To load a movie, go to File > Play Movie. Click on Browse to locate the file you wish to load.

A loaded movie can paused during review and played from that point in order to optimize the run. More information on T.A.S. here
AVI
To record a video in AVI format, go to File > Record AVI. A window will appear asking you where to save the file. Select your path and press Save:

A Video Compression dialog box will appear asking you for the codec you want your file to be encoded in:

The recording of an uncompressed video will yield a 2 Gb file for 2 minutes of recording, or a ratio of 1000 Mb per minute of recording. If the recording is longer than 2 minutes, DeSmuME will create new video files and designate the file name with appendices part 2, part 3, etc. Using Microsoft Video 1 with 50% compression will yield one continuous file of satisfactory quality, with an approximate ratio of 100 Mb per minute of recording. For lossless videos, use Full Frames. Set the compression level if necessary and press OK. An on screen message will appear indicating the start of recording. To stop recording, select File > Stop Movie. An on screen message will appear indicating that the recording has stopped.
WAV
To record a sound file in the WAV format, go to File > Record WAV. A window will appear asking you where to save the file:
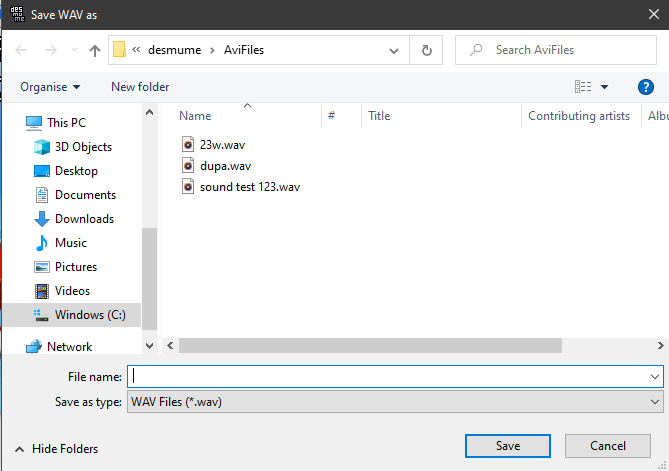
Select your desired path and press Save. An on screen message will appear indicating the start of recording. The output will save a single continous WAV file recorded as faithfully as possible to the exact emulated audio output. To stop WAV recording click File > Stop WAV.
5. Developer Tools
How to Disassemble a ROM
From the top menu, select Tools>Disassembler.
Upon opening the disassembler tool, two pop-up menus will be displayed: the Arm 7 Disassembler AND the Arm 9 Disassembler. Note that these pop-up menus will open up stacked on top of each other, so you will have to separate them (drag and drop) to view both at the same time. For example:

How to View Memory
From the top menu select Tools>View Memory. This tool displays Firmware, ARM7, the ARM9 and Full memory.
How to Dump Memory
From the top menu select Tools>View Memory. You have the option to dump memory as a .txt file (Text dump) or as .bin files (Raw dump). Note that if you dump memory to a file already containing a dump, the new dump will be added to the existing one(s).
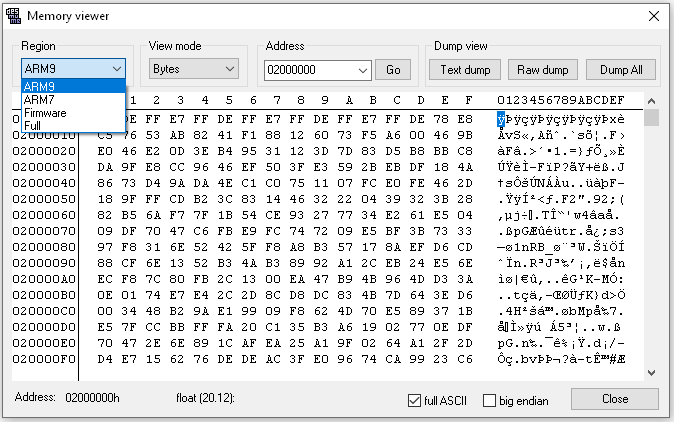
The View mode radio buttons allow you to choose how memory will be displayed. Memory can be displayed as:
- Bytes
- Words
- Halfwords
How to Jump to a Different Address
1.Select the address textbox.
2. Enter an hexadecimal address without 0x prefix, with up to 8 digits
3. Click Go to jump to the entered address
The viewers also allow memory editing. To do so, click on the value you want to edit, then type the new value. The new value is applied only once a hexadecimal address is entered.
How to View Registers
From the top menu select Tools>View Registers. This option lets you view the ARM7 and ARM9 I/O registers.
From the CPU drop-down menu, you can select to view from ARM7 or ARM9.
Using the Registers drop-down menu, you can view all registers at once, or a specific one from the list.

How to View a Game’s Color Palette
From the top menu select Tools>View Palette. Using the drop-down menu you can change which color palette you wish to view. For example, you can choose to view all the colors being used on the Main Screen of a game, or choose from other sections of a game, such as Sub Screens, Textures and more.

How to Disable/Enable Layers
From the top menu select Tools>View Layers. By default, all layers are displayed. To enable/disable a layer, select it’s name from the list.

How to View Game Tiles in Detail
From the top menu select Tools>View Tiles.

How to View Maps in Detail
From the top menu select Tools>View Maps. To change which map you wish to view, select from the drop-down menu.

How to View Object Attribute Memory (OAM)
From the top menu select Tools>View OAM.

How to View Matrices (Matrix)
From the top menu select Tools>View Matrices.

How to View Lights
From the top menu select Tools>View Lights.

How to View Sound Output
From the top menu select Tools> Sound View.

RAM Watch
Ram Watch is intended to aid in making T.A.S. movies by allowing the user to monitor a chosen set of RAM values while making a movie. For RAM Watch to be effective, the user must already know which RAM values to watch. For that purpose, emulators with the RAM Watch dialog also support the RAM Search dialog.
To access Ram Watch in Desmume:
From the top menu select Tools>RAM Watch.
RAM Search
Ram Search is a memory searching dialog to aid in finding useful RAM values. Like any RAM searching dialog, it is designed to start with the entire RAM contents and then the user weeds out values that aren’t what the user is looking for. For more information regarding how to find RAM Values see Memory Search. For an example of a RAM search, click here.
To do a RAM search:
- From the top menu select Tools>RAM Search.
- Press the Reset button. This will put all RAM Values into the available search.
- Advance the game either by frame advance or by letting the game play.
- Set the Comparison Operator and Compare To/By then click the Search button.

How to Run Lua Scripts with DesMume
Lua is a programming language that can be used to interact with DesMume. An example of Lua script in DesMume can be seen here.
To run a Lua Script: From the top menu select Tools> Lua Scripting.

